


the charcuterie board MVP
Charcuterie spreads are a thing of beauty. “Perfect” may be an unrealistic ideal, but if perfection exists on this planet, I’m pretty sure it can be found in a heavily-laden cheese and meat plate.
In Portland, my favorite spot to source components is Providore - or, as I like to call it, “adult Candyland.” I could spend hours wandering the aisles of this culinary wonderland, picking out jewel-toned fresh produce, sifting through the small jars of seasonings, spices and spreads, marveling at the artistry of cracker labels (seriously, flatten and frame some of those boxes and you’ve got a perfect start to a kitchen gallery wall), and - of course - standing in front of the cheese and meat counters, wondering if it’s socially acceptable to press my hands and nose up against the glass like, well, a kid in a candy store.
One of the last things I fed my uncle was a charcuterie board at Christmas. I knew I had to bring it - when I had texted him a photo of the last one I’d made, he’d responded by calling me a “charcuterie mvp.” Obviously, the pressure was on.
The best part about a charcuterie spread, aside from the ingredients, is how it becomes a gathering place at the beginning of a celebration or dinner party. I’ll forever cherish the memory of looking into my grandparents’ living room on Christmas Day to see my family, Tim among them, gathered around the board - laughing, talking, trying different combinations of meats, cheeses and toppings. It cements the moment as one of collective joy, and reminds us that we’ve gathered together around a table to share a meal - and really, to share each other.

Below is a guideline for creating the board of your dreams, the general rules of thumb that I usually like to follow. Take what you need and leave what you don’t - the beauty of a board is that you can truly make it to your personal tastes.
ELIZABETH’S CHARCUTERIE MVP RECIPE (BUT REALLY JUST MORE OF A GUIDE)
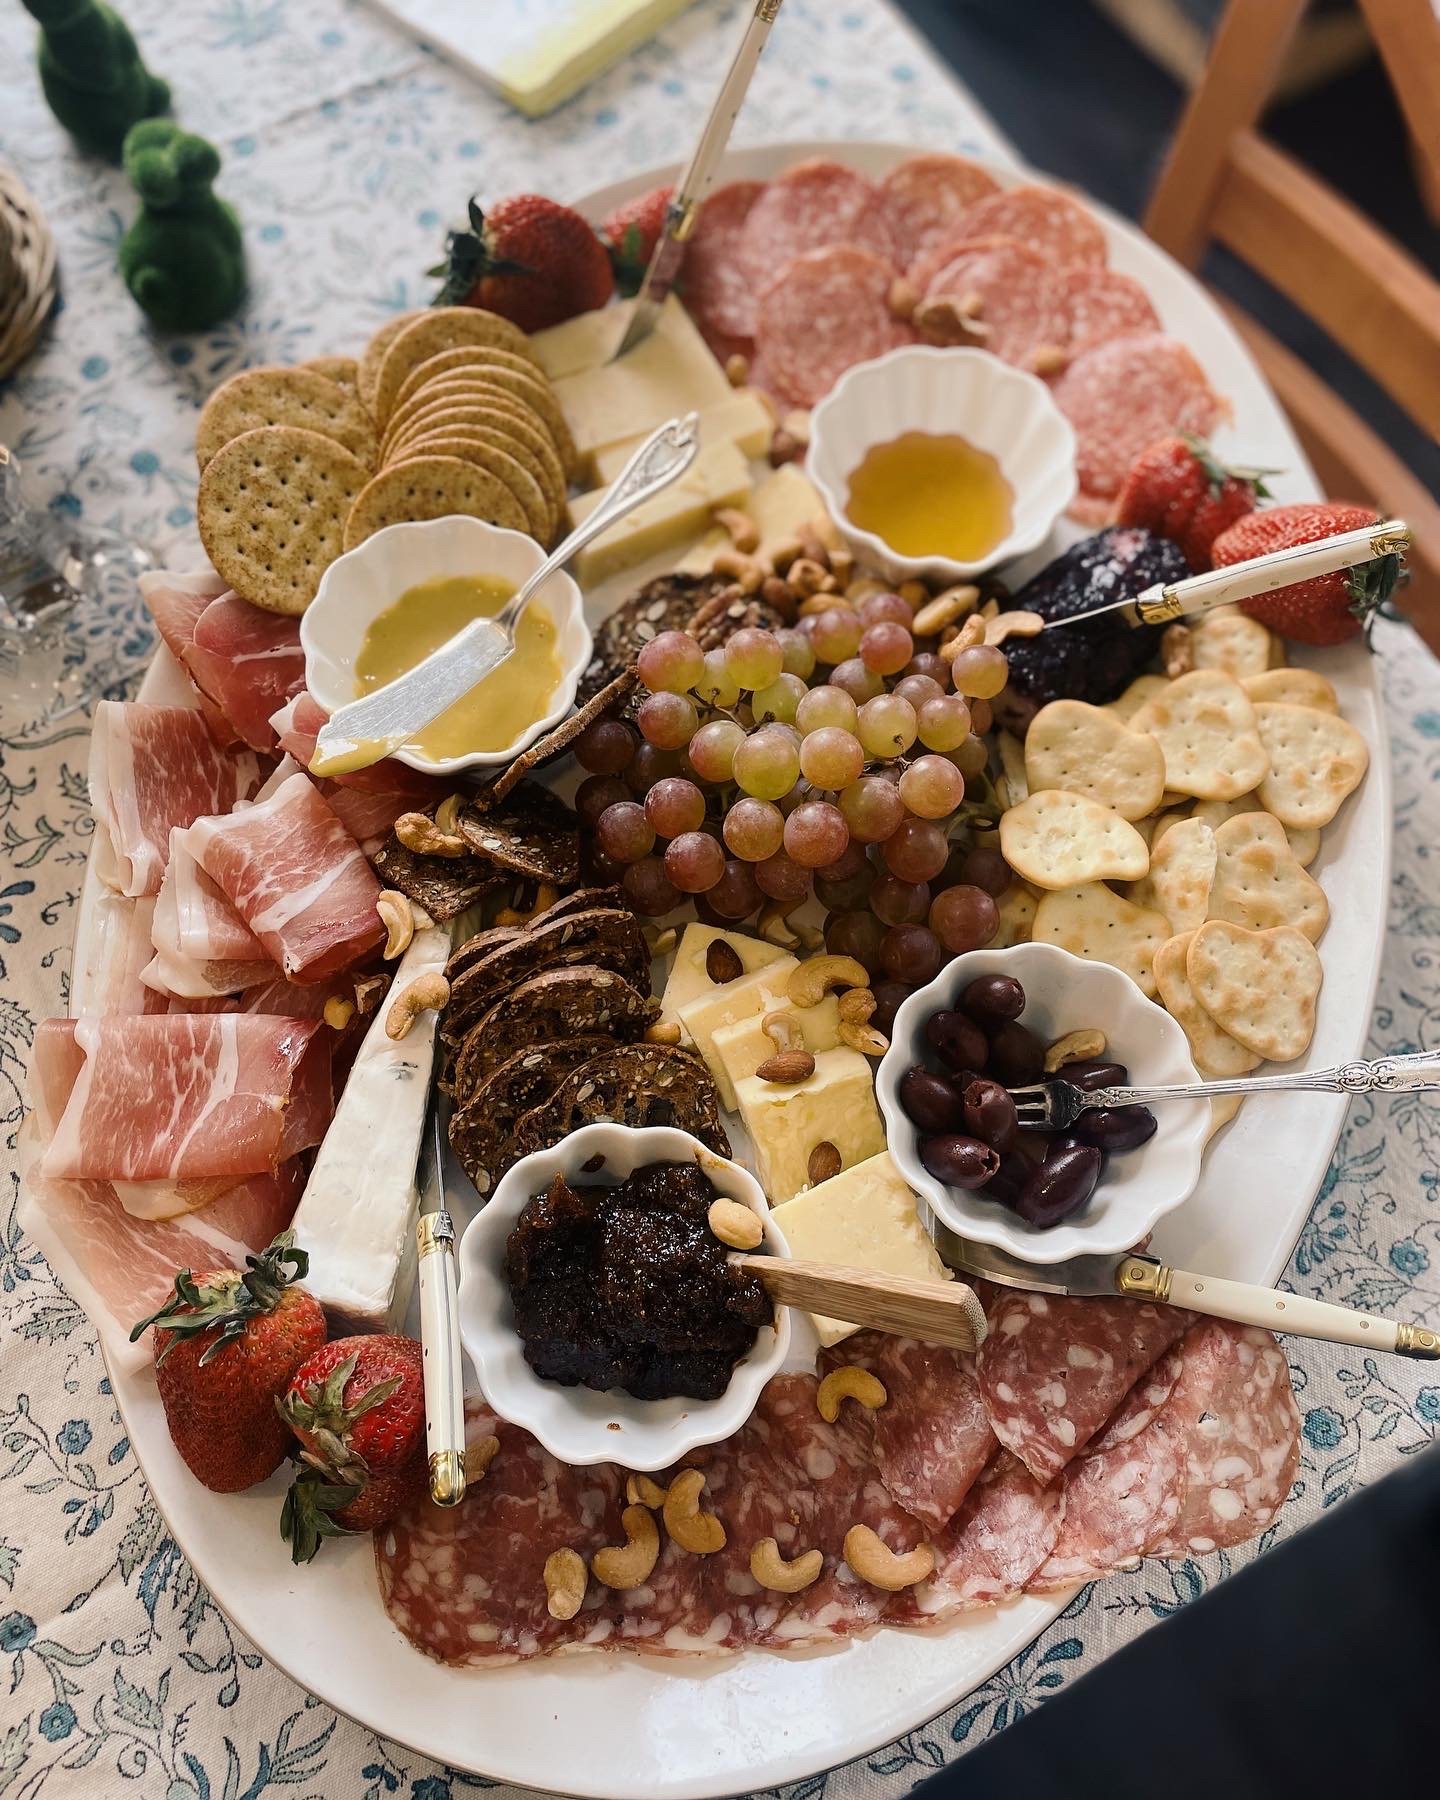
CHEESE
At least three cheeses. Maybe four. (Maybe five, depending on the size of your crowd). I usually go with these basic building blocks: a sharp cheddar (recently, I’ve been loving Coastal Cheddar); a brie; one other harder cheese - don’t discount the power of a good Parmesan - and then a “fun cheese”, one that’s unexpected. At Thanksgiving, I found a wheel of goat cheese that had been smoked in maple leaves and it was a big hit.
MEAT
I usually go with three meats: sopresetta, sliced so thinly it melts in your mouth; prosciutto, draped over itself; and a salami sliced into coins.
CRACKERS
3-4 varieties here. Go basic and boring for one (some people just need a vehicle for the cheese), like a water cracker. Add in one with heft - a Triscut, or baguette chip - for those who are aiming to make their bites fully loaded. Finish with one that has a bit of dried fruit studded throughout, which plays well off a salty cheese or meat.
SPREADS
The first secret to a killer board? A variety of spreads. I like to have four: two sweet (honey, always, and then a fig jam or spread, or quince paste) and two savory (a nice mustard is always a must, and lately I’ve been loving adding in a Trader Joe’s eggplant dip).
EXTRAS
The second secret to a killer board are the extras: unexpected surprises that round out the flavors present on the scene, and add a bit of edge to your guests’ bites. I like to have fruit, usually grapes and oranges, that blend in seamlessly with some of the nuttier cheeses. If you have access to salami-stuffed peppers, you can never go wrong. Pickles and olives, while not loved by all, are favorites of mine. And finally, mixed nuts (these don’t have to be fancy, the Planters variety works just fine), brings it all together.
ASSEMBLY
Start with your cheeses. Place them about equal distances apart throughout the board, and slice each about halfway. Keep your cheese knives with each cheese so guests can continue to carve some out for themselves.
Next, add meat. Aim to place each meat near a cheese. If you need to lightly fold or arrange the meat to reduce the space it takes up, that’s always a good idea.
I swear by putting each of my spreads in small bowls to elevate the appearance on the board. Look for large gaps or holes in the presentation after you place your meat and cheese, and nestle bowls into those. Add in your spreads.
Thread crackers throughout, trying to keep each type a good distance from the others. It’s ok - preferable, even - if some of the crackers lap over some of the meat or cheese. A good board is overflowing. It’s messy. It’s fun.
Now it’s time for your extras. Segment an orange and use it to fill spaces throughout the board. Place a bunch of grapes in the center. Find space for dried fruit, pickles and olives. This is where you should be having fun.
End with the nuts - just scatter them over everything. There’s no order needed here. Build with joy.
Place your masterpiece in front of your guests, and feel the warmth that comes from serving food to the people you love. Never take one moment together for granted.


